Editing Tricks for Enhancing Food Photos
Food photography is an art form, and just like any art form, the magic doesn’t always happen entirely in the camera. Editing is the finishing touch that takes your good food photos and transforms them into mouthwatering masterpieces. It’s where you can subtly enhance colors, adjust lighting, and sharpen details, all to create an image that ignites cravings and has viewers reaching for their phones to order takeout (or dive headfirst into the kitchen!). So, aspiring food photographers, let’s unlock the secrets of editing and elevate your food photography game!
Exposure is King: Setting the Right Tone
Exposure refers to the overall brightness of your image. A properly exposed photo showcases the details and textures of your food without being too dark or blown out. If your image is a little dark, use the exposure slider in your editing software to brighten it up. However, avoid overdoing it – highlights should still have detail, and shadows shouldn’t be completely black.
White Balance: Achieving Color Harmony
White balance ensures the colors in your photo appear natural. Depending on the lighting you used during your shoot, your image might have a slightly yellow or blue cast. The white balance tool allows you to correct this and achieve a more natural and appetizing color palette.
Sharpening Enhances Details: Make Your Food Crisp
Sharpening adds a touch of crispness to your photo, highlighting the textures and details of your food. Be subtle with this adjustment – overdoing it can create an unnatural halo effect around the edges of your subject.
Cropping Creates Compositional Magic
Cropping allows you to refine the composition of your image. Use the rule of thirds or experiment with different framing techniques to create a more balanced and visually appealing photo. Cropping can also help eliminate distracting elements from the background.
Selective Adjustments: Highlighting the Stars
Editing tools like brushes and gradients allow you to make adjustments to specific areas of your image. For example, you can use a brush to brighten up a shadow on your main dish or use a gradient to darken the background and draw the viewer’s eye directly to the food.
Curves for Color Control: Fine-Tuning the Palette
The curves tool allows you to fine-tune the color balance in your photo. You can adjust specific highlights, shadows, and midtones to achieve a more vibrant or muted color palette. This is particularly helpful for enhancing the natural colors of your food.
Local Adjustments: Dodge and Burn for Subtlety
Dodge and burn tools are like digital shadows and highlights. Use the dodge tool to lighten specific areas, like the glistening sauce on your pasta. Conversely, use the burn tool to darken areas that might be distracting, like a blown-out background element. These adjustments should be subtle, creating a more natural and balanced look.
Noise Reduction: Keeping Things Clean
Digital noise can appear as grainy speckles in your photos, especially in low-light situations. Noise reduction tools can help smooth out these imperfections, but be careful not to overdo it, as it can also soften details.
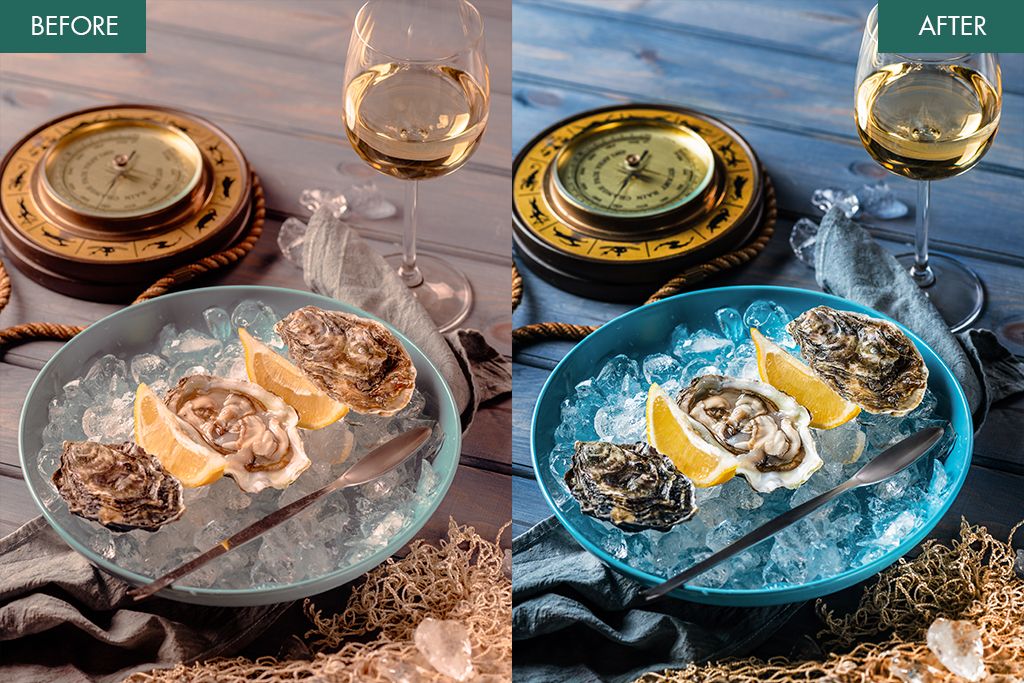
Color Grading: Setting the Mood with Color Tones
Color grading allows you to add a subtle color cast to your entire image. For example, a warm color cast can create a cozy and inviting atmosphere, while a cool color cast can add a touch of sophistication. Experiment with different color tones to see how they affect the overall mood of your food photo.
Presets for Inspiration: A Starting Point for Creativity
Many editing software programs offer preset filters that can be applied to your photos with a single click. These presets can be a great source of inspiration, especially for beginners. However, remember, presets are just a starting point. Don’t be afraid to tweak the settings to create a look that reflects your personal style.
Remember, Editing is Enhancement, Not Transformation
The goal of editing food photography is to enhance the natural beauty of your food, not to create a completely unrealistic image. Avoid excessive adjustments that make the food look artificial. Viewers can usually spot heavily edited photos, and it can create a negative impression.
So, there you have it, aspiring food photographers! With these editing tricks in your arsenal, you’re well on your way to transforming your good food photos into mouthwatering masterpieces. Remember, practice makes perfect, so experiment with different editing tools and discover what works best for your unique style. Happy editing!